Why You’ll Love this Gluten Free Cream Puffs Recipe
You’ll absolutely love this Gluten Free Cream Puffs recipe because it combines simplicity with indulgence in every bite. The process is surprisingly straightforward, making it perfect for both novice bakers and seasoned pros.
I can whip up a batch quickly, and the results never fail to impress. These little puffs are light, airy, and oh-so-delicious!
What really makes this recipe special is the versatility. You can customize the filling with your favorite whipped cream or even add a hint of vanilla or chocolate.
Plus, they’re naturally gluten-free, so everyone can enjoy them! Each bite feels like a treat, and I guarantee they’ll disappear as fast as you can make them.
Trust me, you won’t regret giving this recipe a try!
Ingredients of Gluten Free Cream Puffs
When it comes to whipping up a batch of delightful Gluten Free Cream Puffs, the first thing you need is a solid list of ingredients. This recipe isn’t only gluten-free but also easy to follow, making it a joy to prepare.
You’ll find that the components are pretty straightforward, and chances are, you might even have some of them already in your pantry. Whether you’re planning a party or just want a sweet treat to enjoy on a quiet afternoon, these little puffs are bound to impress.
Here’s what you’ll need to create these airy delights:
- 1 cup water
- 4 tablespoons butter, cut into small pieces
- 1/4 teaspoon iodized salt
- 1 cup all-purpose gluten-free flour (I recommend Tom Sawyer’s GF All-Purpose Flour)
- 4 eggs
- 1 egg yolk, lightly beaten
- 2 tablespoons milk
- 2 cups whipping cream (I used Cool Whip for ease)
- Powdered sugar for sprinkling
Now, when it comes to the ingredients, a few things are worth mentioning. First off, if you’re using a gluten-free flour blend, make sure it’s a good quality one that you trust. Different brands can behave differently, so stick to what you know works for you.
Also, while I personally love the convenience of Cool Whip for the whipped cream, you can always go the homemade route if you’re feeling ambitious. A fresh whipped cream can add an extra layer of flavor that’s hard to beat.
And don’t forget the powdered sugar for that final touch—it’s like the cherry on top of these delightful puffs! So gather your ingredients, and get ready for some fun in the kitchen.
How to Make Gluten Free Cream Puffs

Making Gluten Free Cream Puffs is like starting a delightful culinary adventure. First things first, preheat your oven to a toasty 375°. While that’s warming up, grab a large cookie sheet and give it a spritz of Pam to guarantee our lovely puffs won’t stick.
Now, let’s get to the heart of the matter—bringing together the ingredients. In a sturdy saucepan, pour in 1 cup of water. Toss in the 4 tablespoons of butter, cutting them into small pieces to help them melt a bit faster. Add the 1/4 teaspoon of iodized salt, and place that pan over medium-low heat. You want the butter to melt smoothly before the water boils. Once you see the bubbles starting to pop, it’s time to take the pan off the heat.
Next, here comes the fun part. Immediately add in 1 cup of sifted gluten-free flour (and yes, I highly recommend Tom Sawyer’s GF All-Purpose Flour for this). Stir vigorously with a wooden spoon until the dough forms a ball and the bottom of the pan has a nice film of flour. It’s a bit of a workout, so don’t be shy about getting those arms moving.
Let the dough rest for about 5 minutes—this is important, trust me. Then, one by one, beat in the 4 eggs until the mixture is smooth and stiff. At this point, I like to use my trusty food processor because why not make it easier? Once your dough is ready, drop 1/4 cupfuls onto the baking sheet, spaced about 3 inches apart. If you’re feeling fancy, whip out a pastry bag (or a gallon Ziploc bag, no shame here) and pipe out those mini puffs.
Brush the tops with a mixture of 1 beaten egg yolk and 2 tablespoons of milk to give them that gorgeous golden sheen while they bake. Now, slide those beauties into the oven and let them work their magic for about 35 minutes, or around 15 if you went the mini route. You want them puffed up, golden brown, and firm to the touch.
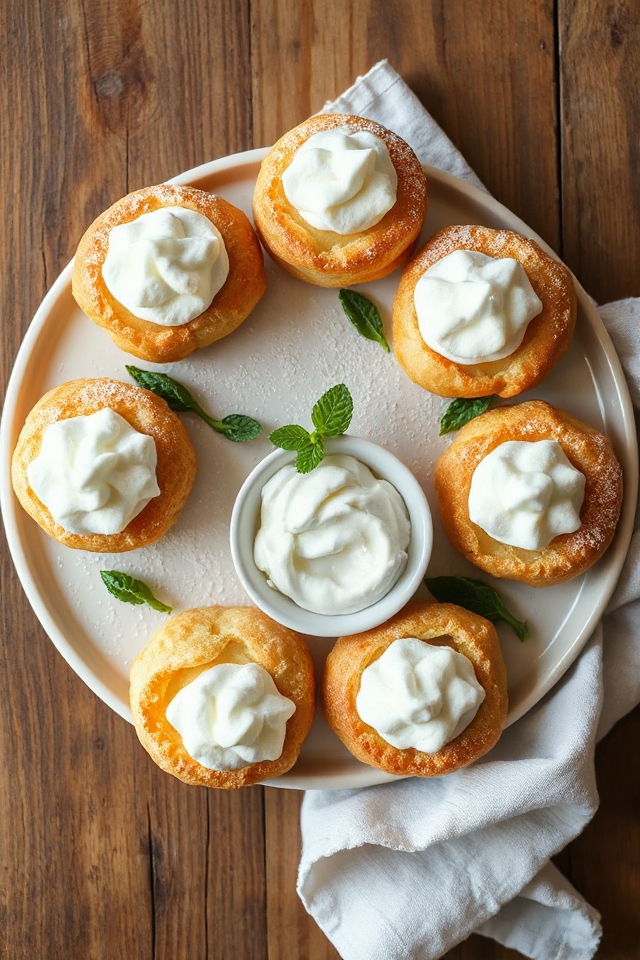
Once they’re done, let them cool on a wire rack—don’t skip this step unless you enjoy soggy puffs. Pricking them with a toothpick helps release steam, so they stay nice and hollow inside. When they’re cool enough, cut off the tops, scoop out any moist dough (no one wants a soggy bottom), and fill them with your whipped cream—Cool Whip makes it easy, but go homemade if you’re feeling ambitious.
Replace the tops and give them a dusting of powdered sugar. And there you have it, your very own gluten-free cream puffs, ready to impress friends or to be devoured in private, no judgment here.
Gluten Free Cream Puffs Substitutions & Variations
Substituting ingredients in gluten-free cream puffs can open up a world of flavor and texture. For a nutty twist, I often swap in almond flour for some of the all-purpose flour; it adds a delightful richness.
If you’re dairy-free, coconut oil works as a butter substitute, and coconut cream can replace heavy whipping cream for a tropical flair.
Want a chocolatey treat? Just mix cocoa powder into the dough or whip cocoa into your cream filling. You can also experiment with flavored extracts—vanilla, almond, or even orange can elevate the puffs.
And if you’re in a rush, pre-made gluten-free pastry dough is a handy shortcut! The possibilities are endless, so get creative and enjoy your baking adventure!
What to Serve with Gluten Free Cream Puffs
While gluten-free cream puffs are delightful on their own, pairing them with the right accompaniments can elevate your dessert experience.
I love serving them with a side of fresh berries, like strawberries or blueberries, which add a burst of color and flavor. A drizzle of chocolate sauce or a rich caramel can also enhance their sweetness, creating a decadent treat.
For a more sophisticated touch, I sometimes offer a dollop of lemon curd or a fruit compote, which balances the creaminess of the puffs.
If I’m feeling adventurous, a scoop of vanilla or coffee ice cream on the side transforms the dessert into a delightful sundae.
Experimenting with these pairings has been a fun way to impress my guests!
Additional Tips & Notes
To guarantee your gluten-free cream puffs turn out perfectly, I recommend paying close attention to the dough’s consistency. It should be stiff yet smooth; if it’s too runny, your puffs won’t hold their shape.
Don’t skip the resting time after mixing the dough—this helps it firm up. When baking, keep an eye on them; every oven is different, and you want that golden brown color.
Once they’re baked, remember to poke them to release steam—this prevents sogginess. For filling, use a pastry bag for a neat finish, and don’t fill them until they’re completely cool to maintain that crisp exterior.
Finally, enjoy experimenting with flavored whipped cream for a delightful twist!