Why You’ll Love this Gluten Free Breaded Chicken Recipe
When you crave a crispy, satisfying meal without the gluten, this breaded chicken recipe is a game changer. I can’t get enough of it!
The crunchiness of the oats paired with the savory parmesan creates a flavor explosion that really satisfies my cravings. Plus, it’s incredibly easy to whip up, making it perfect for busy weeknights or weekend gatherings.
I love how versatile it is; I can pair it with just about any side dish or toss it into a salad for a hearty meal. Knowing that I’m enjoying something delicious and gluten-free makes every bite even better.
Trust me, once you try this recipe, you’ll want it on your dinner rotation!
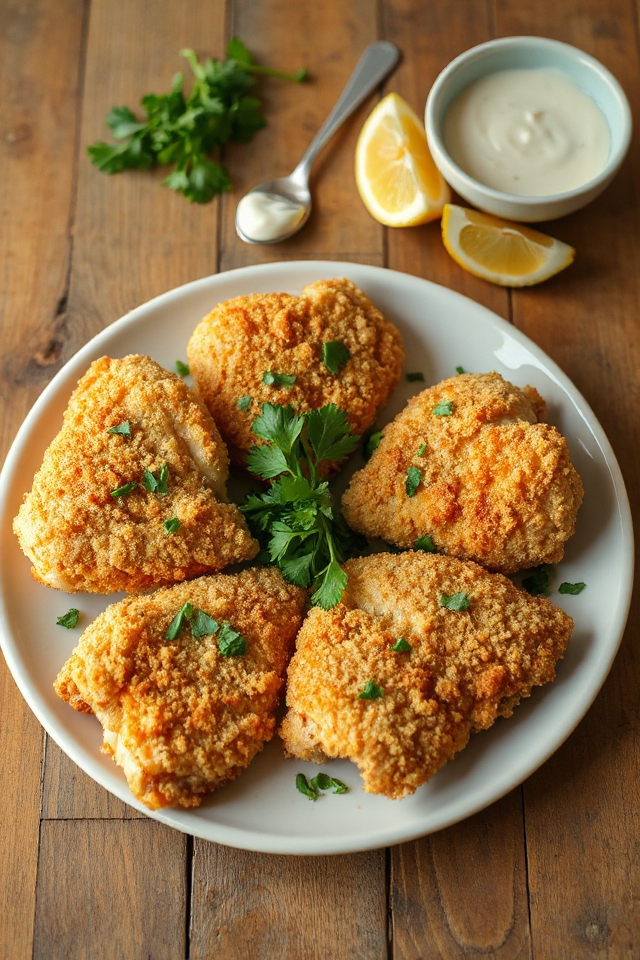
Ingredients of Gluten Free Breaded Chicken
When it comes to whipping up a delicious meal, this gluten-free breaded chicken recipe is a go-to for me. Not only is it super simple, but the ingredients come together to create a crispy, flavorful dish that your taste buds will thank you for.
Seriously, I’m not exaggerating—every time I make this, my family devours it in record time. Let’s explore what you’ll need to create this tasty masterpiece.
Ingredients for Gluten Free Breaded Chicken:
- 10 boneless skinless chicken thighs
- 3/4 cup ground oats (you can use a coffee grinder for this)
- 1/4 cup parmesan cheese
- 1/2 teaspoon paprika
- 1/4 teaspoon oregano
- 1/4 teaspoon onion powder
- 1/4 teaspoon thyme
- 1/4 teaspoon ground black pepper
- 1/2 teaspoon salt
- 1 egg
- 1/4 cup milk
Now, let’s talk about these ingredients a bit. First off, if you’re like me and tend to forget that oats can be ground up into a flour-like consistency, this is your reminder.
It’s a neat little trick that keeps your breading gluten-free and still crunchy. And don’t skimp on the parmesan; it adds this beautiful, savory edge to the chicken that’s just delightful.
If you’re dairy-free, you can always swap the parmesan with a dairy-free alternative. Plus, feel free to tweak the seasonings to your liking—maybe a little garlic powder or some cayenne pepper if you’re feeling adventurous?
Cooking is all about experimenting, right? So gather your ingredients, and get ready to make some crispy goodness.
How to Make Gluten Free Breaded Chicken

Alright, let’s plunge into making this crispy gluten-free breaded chicken. First things first, preheat your oven to 350°F. This is a vital step—nobody likes soggy chicken, right?
While that’s heating up, grab a large bowl and combine all your dry ingredients: 3/4 cup of ground oats (remember, you can whiz those oats in a coffee grinder if you haven’t got oat flour), 1/4 cup of parmesan cheese, 1/2 teaspoon of paprika, 1/4 teaspoon each of oregano, onion powder, thyme, and ground black pepper, plus a solid 1/2 teaspoon of salt.
Mix those together and just take a moment to appreciate the aroma. Seriously, it’s like a flavor explosion waiting to happen.
Now, in a separate bowl, you’ll want to whisk together 1 egg and 1/4 cup of milk. This is your wet mixture that’s going to help that glorious breading stick to the chicken thighs.
Dip each of the 10 boneless skinless chicken thighs into the milk and egg mixture, letting any excess drip off, before rolling it into the dry mix. Make sure each thigh is well-coated—this is where the magic happens.
Once you’ve breaded all the chicken, place them on a lightly greased baking sheet. No one wants a sticky situation at the end, trust me.
Now it’s time to pop that baking sheet into the oven and let the chicken bake for about 30 minutes. It will sizzle and start to look golden brown.
You may find yourself pacing in front of the oven, wondering if the timer is broken because the smell is just too enticing.
And when it’s finally done, take a moment to admire your handiwork before plunging in. The chicken should be crispy on the outside and juicy on the inside—just the way we like it.
Enjoy your delicious creation, and don’t be surprised if you find everyone asking for seconds.
Gluten Free Breaded Chicken Substitutions & Variations
After whipping up that crispy gluten-free breaded chicken, you might be wondering how to customize it to suit your taste or dietary needs.
You can easily swap the ground oats for gluten-free breadcrumbs or almond flour for a different texture. If you’re dairy-free, consider using nutritional yeast instead of parmesan for a cheesy flavor without the milk.
Spice lovers can add cayenne pepper or garlic powder to the dry mix for an extra kick. For a lighter option, try using egg whites instead of whole eggs.
You can even experiment with different herbs, like basil or rosemary, to give your chicken a unique twist. These substitutions and variations keep your meals exciting and tailored just for you!
What to Serve with Gluten Free Breaded Chicken
Pairing gluten-free breaded chicken with the right sides can elevate your meal to a whole new level.
I love serving it with a fresh salad, tossed with mixed greens, cherry tomatoes, and a zesty vinaigrette.
Roasted vegetables, like carrots and Brussels sprouts, provide a delightful contrast to the crispy chicken.
If you’re in the mood for something hearty, creamy mashed potatoes or quinoa can complement the flavors beautifully.
For a fun twist, I sometimes whip up a side of coleslaw, adding a revitalizing crunch to the plate.
And don’t forget a dipping sauce! A tangy honey mustard or a classic ranch dressing can really enhance the experience.
Enjoy experimenting with these pairings to find your perfect match!
Additional Tips & Notes
When it comes to making crispy gluten-free breaded chicken, a few additional tips can help you achieve the best results.
First, make sure your chicken thighs are patted dry; moisture can make the breading soggy. I like to let the coated chicken rest for about 10 minutes before baking, allowing the breading to adhere better.
For extra crunch, consider adding crushed gluten-free cornflakes or rice cereal to the dry mix. If you want a richer flavor, try using garlic powder instead of onion powder.
Finally, keep an eye on the cooking time; ovens can vary. If you prefer a golden finish, broil the chicken for a couple of minutes at the end.
Enjoy your perfectly crispy creation!